
USER GUIDE
GETTING STARTED
WARRANTY
Our lightsabers come with a two years warranty. It starts from the day of the purchase and covers defects in original materials and original workmanship.
WARNING
This product is not suitable for children under the age of 12. Children under the age of 18 should be supervised by an adult. Don’t hit anybody with the lightsaber. Always use included charging accessories. Voltage : always at a maximum of 5V 1A. Failure to comply with these instructions will result in a fire hazard, damage electronics and will void your warranty. Any modifications, or damages done to your lightsaber, will void your warranty.
FIRST STEPS
The hilt and the blade come separately inside the box to prevent any damage during delivery. Please note that before any use of your lightsaber, it is important to fully charge the battery.
Some our lightsabers have a charging port directly on the hilt. Other models have the charging port inside the chassis, it is then needed to remove the pommel or the handle in order to access this port.
Other models don’t have a recharge port. The battery must be removed and placed in the appropriate charging device and placed back inside the lightsaber once fully charged.
With our Master and Exile series, it is important to sure that the blade makes contact with the pogo-pins inside the chassis. The blade must be screwed firmly to the hilt with all the retention screws (the blade must not move by any means), but not too strong either in order to prevent any damages to the blade, the retention screws or even the hilt's threads.
PACKAGE
When you order a lightsaber, we prepare your packages with good care. We check that the lightsaber(s) work(s) normally, that there are no defaults or scratches on the hilt, then we pack everything carefully as if we packed it for ourselves. When you open your package, if you notice anything abnormal, please contact us immediatelly. Your package will contain:
• Hilt(s),depending on your order, or some models come with 2 hilts
• Blade(s), depending on your order
• Charging Device, either a charging USB-C cable, or a charger
• Tools, all needed tools for your lightsaber (usually an HEX key)
• Retention Screws, (Usually M3 or M4 type screws)
• Warranty Card, a 1 year warranty card
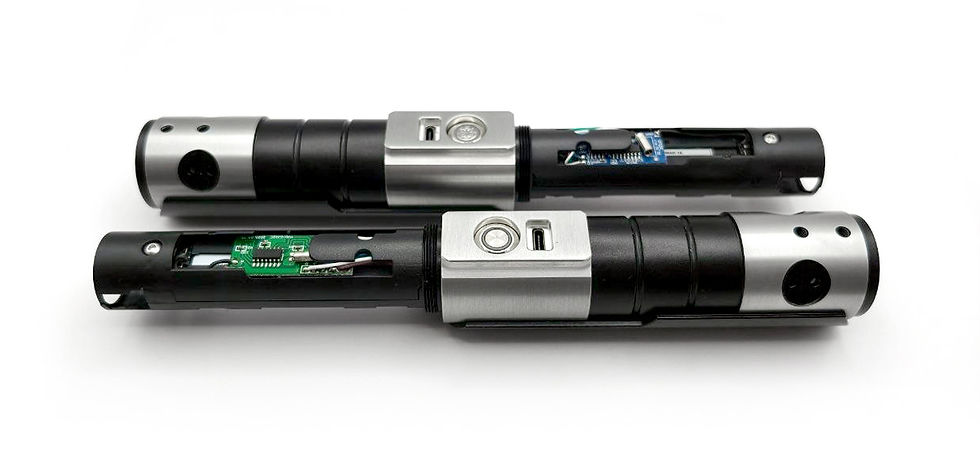
HILT
All models are different. What is shown here is set as an example. Most lightsabers function the same way; an emitter, where the blade is attached, a button part, a handle and a pommel. Note that some models can have a different achitecture.
BATTERIES
Always use the charging device that comes with your order. If there are no charging devices inside the package, please contact us. We will send you a new one right away. Don't try using other devices. Any damages caused by the use of wrong charging devices will void your warranty.
Some models only come with a USB-C charging cable. It can be connected to a USB port on your PC, phone charger, wall outlet, but be sure to always use a maximum voltage of 5V 1A. Failure to comply with these instructions will result in a fire hazard, damage electronics and will void your warranty. Any modifications, or damages done to your lightsaber, will void your warranty
Some models have a charging port visible on the hilt. Other models have a USB-C charging port on the chassis, inside the hilt. In order to access the port, the handle part needs to be removed.
Other models don't have a charging port. In that case, the battery must be removed and placed in the charging device that comes with your lightsaber. To access the battery, depending on your model, you will need to unscrew and remove the pommel, then to slide down the chassis, on other models, retention screws will need to be unscrewed too in order to remove the chassis. Finally, on a few models with button parts, you will need to remove the button plate, unscrew the visible screws and unscrew and remove the handle.
BLADES
Blades come appart from the hilt in order to avoid any damages during transport. If you have ordred a "neopixel" lightsaber (Xeno2, Xeno3, Proffie), please make sure that the bottom of the blade is in contact with the pins inside the hilt on the châssis.
1" BLADE
Insert the blade inside the hilt on the emitter end, fasten the retention screws, strong enough to secure the blade, but not too strong to prevent any damages to the blade or hilt.
7/8 BLADE
The process is the same as with the 1" blade. If your hilt is made for 1" blades but still want to mount a 7/8 blade, you need to place an adapter at the bottom end of the blade.
REMINDER
The sound of your lightsaber is weird, it crackles or the sound goes off? Don’t worry, your lightsaber isn’t broken. This sound only means your battery is running low and needs to be recharged.
You have charged your lightsaber several hours but it still does the same. No wories. Again, your lightsaber is fine. It’s unusual but may occur from time to time, with transport, or if you do dueling, the battery might have moved a little in the chassis. Unscrew the pommel/bottom part of your lightsaber to access the battery, remove the battery and place it back.
This should have solved the problem. It usually solves many issues you might encounter with your saber.
Same goes if your lightsaber won't turn on. Removing the battery and placing it back will correct that problem.
Please note that we always double check your sabers before sending them. When we assemble them, again when we pack them. They are strong products and are unlikely to break. They are designed to handle shocks.
Most of the issues you might encounter are either minor issues that can be very easily solved, or a simple misunderstanding of how to handle the saber. It does take time to get familiar with a lightsaber.
They are complexe items with several functions and only one button, it’s common to enter a mode without knowing it. If you have any questions, please contact us, we will gladly answer you.
The sound of your lightsaber is weird, it crackles or the sound goes off. Don’t worry, your lightsaber isn’t broken. This sound only means your battery is running low and needs to be recharged.
You have charged your lightsaber several hours but it still does the same. No wories. Again, your lightsaber is fine. It’s unusual but may occur from time to time, with transport, or if you do dueling, the battery might have moved a little in the chassis. Unscrew the pommel/bottom part of your lightsaber to access the battery, remove the battery and place it back.
This should have solved the problem. It usually solves many issues you might encounter with your saber.
Same goes if your lightsaber won't turn on. Removing the battery and placing it back will correct that problem.
Please note that we always double check your sabers before sending them. When we assemble them, again when we pack them. They are strong products and are unlikely to break. They are designed to handle shocks.
Most of the issues you might encounter are either minor issues that can be very easily solved, or a simple misunderstanding of how to handle the saber. It does take time to get familiar with a lightsaber.
They are complexe items with several functions and only one button, it’s common to enter a mode without knowing it. If you have any questions, please contact us, we will gladly answer you.
STUNT
BLADE IS OFF
• IGNITION: Press activation switch
BLADE IS ON
• BLASTER DEFLECTION: Press activation switch
• LOCK-UP: Hold activation switch 1s (1 LED flash)
• COLOR WHEEL MODE: Hold activation switch 2s (2 LED flashes), release & hold again
• COLOR SELECTION: Once desired color is reached, release activation switch.
• BLADE OFF: Hold activation switch 3s (4 LED flashes)
RGBx
BLADE IS OFF
• IGNITION: Press activation switch
• VOLUME ADJUST: Hold activation switch 0,5s (1 LED flash)
• BLADE EFFECTS (Stable/Unstable/Pulse): Hold activation switch 1s (2 LED flashes)
• MOTION CONTROL on/off: Hold activation switch 1,5s (3 LED flashes)
• FLASH ON CLASH on/off: Hold activation switch 2s (4 LED flashes)
• FONT SELECTION: Hold activation switch 2,5s (5 LED flashes)
• FONT SELECTION (motion control): Quick twist
• DEEP SLEEP: Hold activation switch 10s
BLADE IS ON
• BLASTER DEFLECTION: Press activation switch
• LOCK-UP: Hold activation switch 0,5s (1 LED flash)
• COLOR SELECTION: Hold activation switch 1s (2 LED flashes)
• QUICK COLOR CHANGE: Hold activation switch 1,5s (3 LED flashes)
• BLADE OFF: Hold activation switch 2s (4 LED flashes)
XENO2
BLADE IS OFF
• IGNITION: Press activation switch
• VOLUME ADJUST: Hold activation switch 0,5s (1 LED flash)
• BLADE EFFECT: Hold activation switch 1s (2 LED flashes)
• BLADE MODE: Hold activation switch 1,5s (3 LED flashes)
• FONT SELECTION on/off: Hold activation switch 2s (4 LED flashes)
BLADE IS ON
• BLASTER DEFLECTION: Press activation switch
• DRAG EFFECT: Hold activation switch 0,5s (1 LED flash)
• COLOR SELECTION: Hold activation switch 1s (2 LED flashes) then quick press to select
• BLADE OFF: Hold activation switch 1,5s (3 LED flashes)
MOTION CONTROL
• IGNITION: Stab upfront motion
• FONT SELECTION: Twist while the saber is pointing down
• MUSIC on/off: Twist while the saber is pointing up
• LOCK-UP: Hold activation switch and hit the blade (release the switch to end mode)
• COLOR SELECTION: Hold activation switch and twist while the saber is pointing down
XENO3
BLADE IS OFF
• ACTIVATION: Hold activation switch 2 seconds
• IGNITION: Press activation switch
• VOLUME ADJUST: Hold activation switch 0,5s (1 LED flash)
• BLADE EFFECT: Hold activation switch 1s (2 LED flashes)
• BLADE MODE: Hold activation switch 1,5s (3 LED flashes)
• NEXT FONT: Point down the saber and twist counterclockwise and clockwise
• PREVIOUS FONT: Hold activation switch 2s (4 LED flashes)
• PLAY MUSIC: Point up the saber and twist counterclockwise and clockwise
BLADE IS ON
• LOCK UP: Hold activation switch and hit the hilt
• DRAG EFFECT: Hold activation switch 0,5s (1 LED flash)
• COLOR SELECTION: Hold activation switch 1s (2 LED flashes) then quick press to select
• TWIST COLOR: Point down the saber, hold switch and twist clockwise and counterclock
• FORCE EFFECT: Point the saber up, hold switch and twist clockwise and counterclock
• BLASTER DEFLECTION: Press activation switch
• STAB: Thrust the saber forward
• SPIN: Hold switch quickly
• MELT: Hold Button and stab(twist to change color)
• LIGHTNING BLOCK: Hold switch and pull the saber inwards
• BLADE OFF: Hold activation switch 1,5s (3 LED flashes)
• DEACTIVATION: Turn the blade OFF then hold activation switch 10 seconds
• PIXEL TO RGB/RGB TO PIXEL: Hold activation switch 13 seconds while the saber is off
PROFFIE v2.2
BLADE IS OFF
• IGNITION: Press activation switch.
• IGNITION without PREON: Press activation switch while pointing the blade up.
• IGNOTION in MUTE MODE: 4 short press and hold activation switch.
• VOLUME ADJUST: To enter mode, hold activation switch + hit on the hilt. Volume Up: Hold activation switch and release.
Volume Down: Double press and hold activation switch 1 second, release.
• NEXT SOUNDFONT: Hold activation switch about 2 seconds.
• PREVIOUS SOUNDFONT: Double press and hold activation switch 1 second.
• PLAY/STOP MUSIC: 4 press activation switch.
• BATTERY LEVEL: 3 press and hold activation switch.
BLADE IS ON
• NEXT SOUNDFONT: Hold activation switch while pointing the blade up.
• PREVIOUS SOUNDFONT: Double press and hold activation switch, pointing up.
• PLAY/STOP MUSIC: 4 press activation switch.
• CLASH EFFECT: Hit the blade against something (not a person).
• BLASTER BLOCK: Press or double press activation switch.
• STAB: Push your saber forward (stabbing movement).
• MELT: Push your saber forward and backward (stabbing movement and back).
• DRAG EFFECT: Hold activation switch + hit on the hilt.
• LIGHTNING BLOCK: Double press and hold activation switch.
• BATTLE MODE on/off: 3 press and hold activation switch. You must Exit this mode if you want to change to another mode or turn the blade off.
• FORCE EFFECT: Hold activation switch + twist the hilt while pointing the blade forward
• CHANGE COLOR: Hold activation switch + twist your hilt while pointing blade down. Rotate the hilt to cycle through all available colors. Press and hold activation switch to save and exit. Triple press activation switch to exit color changing mode without saving.
• BLADE OFF: Hold activation switch until the blade turns off.
GFX3
Your combat lightsaber GFX3 may be mounted with a different core. The first generation were mounted with a STUNT electronic core, and the second generation of GFX3 were mounted with an RGBx electronic core. Please refer to the dedicated sections above.
How do I know which version I have? Well it's very simple, when you have unscrewed the handle part of your hilt, take a look at the electronic ship on your core. The green ship is the STUNT version, the blue ship is the RGBx version.
RGBx version
STUNT version
GFX4
POWER MANAGEMENT
• IGNITION: While OFF, hold MAIN Button for 1 second
• BLADE ON: Click MAIN Button
• BLADE OFF: While blade is ON, hold MAIN Button for 1 second.
• TURN OFF: While blade is OFF, hold AUX Button for 10 seconds.
(your lightsaber will automatically turn off after 30 minutes).
COMBAT & TACTICAL EFFECTS
• BLASTER DEFLECT: Click AUX Button.
• FORCE ABILITY: Hold MAIN Button + Twist Hilt clockwise, then counter-clockwise.
• LOCK-UP: Hold AUX Button + Clash blade. Release Button to stop.
• TIP DRAG: Hold MAIN Button + Clash blade. Release Button to stop.
• STAB: Thrust the saber forward.
• MELT: Hold AUX Button + Thrust the saber forward. Twist hilt to change color.
• MULTi-LOCK: Hold AUX Button for 0.5 seconds. Release button to stop.
• MULTi-BLOCK: Hold AUX Button for 1 second. Release button to stop.
BLADE COLOR SELECTION
• COLOR CYCLE: Hold AUX Button + Twist Hilt clockwise, then counter-clockwise.
• SOLID COLOR: Hold AUX Button + Twist Hilt counter-clockwise, then clockwise.
• QUICK CHANGE: Hold MAIN Button + Twist Hilt counter-clockwise, then clockwise.
SYSTEM SETINGS (BLADE IS OFF)
• SOUND FONT: Click AUX Button for the next soundfont. Hold AUX button for 2 seconds (or 4 LED flashes) for the previous soundfont.
• VOLUME: Hold AUX Button for 0.5 seconds (or 1 LED flash) then release.
• BATTERY STATUS: Hold AUX Button for 1 second (or 2 LED flashes) then release.
• BLADE STYLE: Point your lightsaber downward + twist the hilt.
• SABER MODE: Hold MAIN Button + Click AUX Button.
• FLASH-on-CLASH: Hold AUX Button for 1.5 seconds (or 2 LED flashes) then release.
PLEASE REMEMBER THAT GFX4, LIKE ALL OUR COMBAT AND STUNT SABERS DO NOT COME WITH A SOUND SPEAKER, THEREFORE THEY PRODUCE NO SOUNDS.
